How to use shrink wrap for soap
1.Cut off the bottom edge of a shrink wrap bag with a heat sealer. When you look at shrink wrap bags, you’ll notice that the bottom edge is already sealed. Right next to the seam is a strip of excess plastic. Use your heat sealer to cut this bottom edge off. To use a heat sealer:[1]
Plug in and turn on your heat sealer.
Open the heat sealer and place the bag between the blades.
Close the heat sealer, like a paper guillotine.
Wait 2 to 3 seconds, then open the heat sealer.

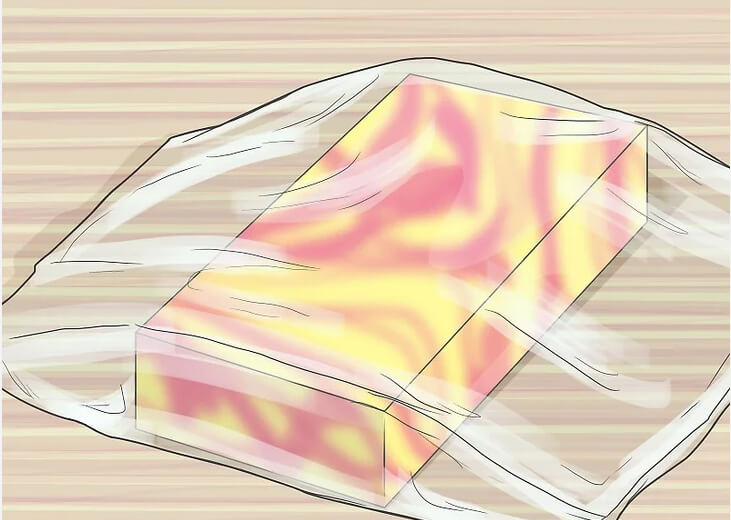
2.Insert your soap into the bag, making sure that it’s centered. Some people find it helpful to place a business card against the back of the soap while sliding it into the bag. This will help the bag lay flat as you insert the soap. If you do this, however, be sure to take the card out of the bag.[2]
Don’t worry if the bag looks to be too big for the soap.
This method will work for round, disk-shaped soaps as well. It is not recommended for other shapes, like hearts or stars.
3.Seal the top and sides of the bag. Open up your heat sealer and place the top edge of the bag between the blades. Clamp the heat sealer, wait 2 to 3 seconds, then open it. If the bag is too wide for the soap, slide the soap towards 1 side of the bag, and heat seal the remaining side.[3]
Place the soap close enough to the heat sealer so that it bumps against the edges of the outer frame. This will bring the blades as close as possible to the soap.
There will be small gaps between the edges of the soap and the seams on the bag. This is perfectly fine.
Every so often, scrape the heat sealer’s blades clean with the top/blunt edge of an X-acto blade.
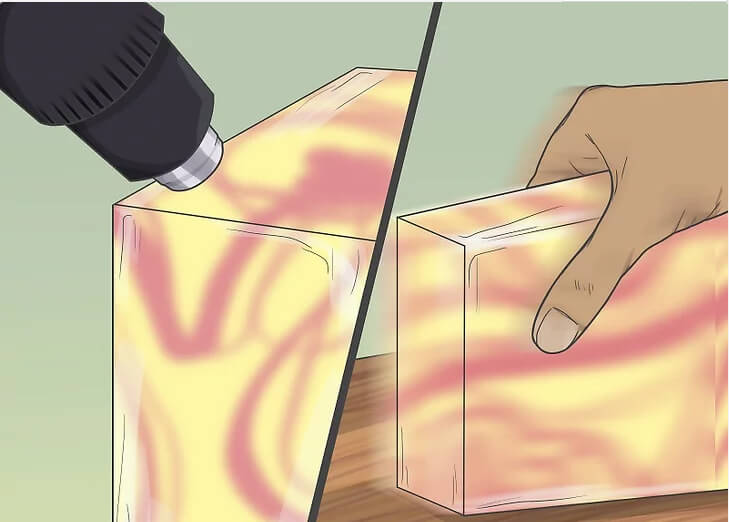
4.Heat the front, back, and side edges of the soap with a heat gun. Get out a craft-grade heat gun and turn it on. Aim the nozzle at the soap, and heat all sides of the soap until the plastic shrinks against it.[4]
Start with the side edges, then do the front.
Don’t worry if the seams look loose and wrinkly. You’ll fix that next.
Don’t use a hairdryer; it’s not strong enough. You can get heat guns from the embossing section of a craft store.
5.Re-heat the sides while rubbing them across a flat surface. Get out a hard, flat surface, such as a wooden cutting board. Heat one side of your soap with your heat gun, then rub that side against the flat surface. Repeat this step for each side of the soap.[5]
You only need to do this for the sides that have the seams.
If your soap is disk-shaped, then work your way around the circumference of the soap, 1 to 2 inches (2.5 to 5.1 cm) at a time.
6.Add a label, then add a second layer of shrink wrapping, if desired. If this is for a store, then you likely have some labels. Peel off one of your labels, and press it against the front of the soap. If you’re worried about the label getting dirty or ruined, then cover the soap with a second layer of shrink wrap.[6]
Use the exact same process for the second layer of shrink wrap as you did for the first.
If the second layer of shrink wrap gets air trapped inside of it, press down on it. Poke a small hole through the outer layer with a pin, if you have to.